Building a RESTful API using Python & Flask-RESTPlus
Introduction
Flask-RESTPlus is a great Python library to help quickly build well structured RESTful APIs. This post is a guide on how to build REST APIs as well as expose documentation using Swagger.
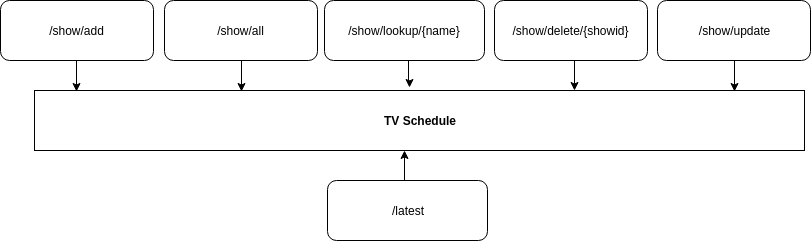
As an example I shall be using a TV Show Schedule web application using Python. The CRUD functions are used.
- Create: Add new Show
- Read: Show All, Show Lookup, Schedule Latest
- Update: Show Update
- Delete: Show Delete
Overview
Installation
Install flask-restplus using pip.
pip install flask-restplus
Namespace
Namespace are not always necessary but aids in organizing APIs, and allows a grouping mechanism of related resources.
The app itself can be split into reusable namespaces. You can define multiple namespaces, particularly useful when scaling the app and maintaining multiple versions of APIs.
webapp/
├── app.py
├── core
│   ├── __init__.py
│   ├── db_utils.py
│   └── tv_utils.py
└── apis
    ├── __init__.py
    ├── ns_tvsched.py
    ├── ns_movienews.py
    ├── ...
    └── namespaceX.py
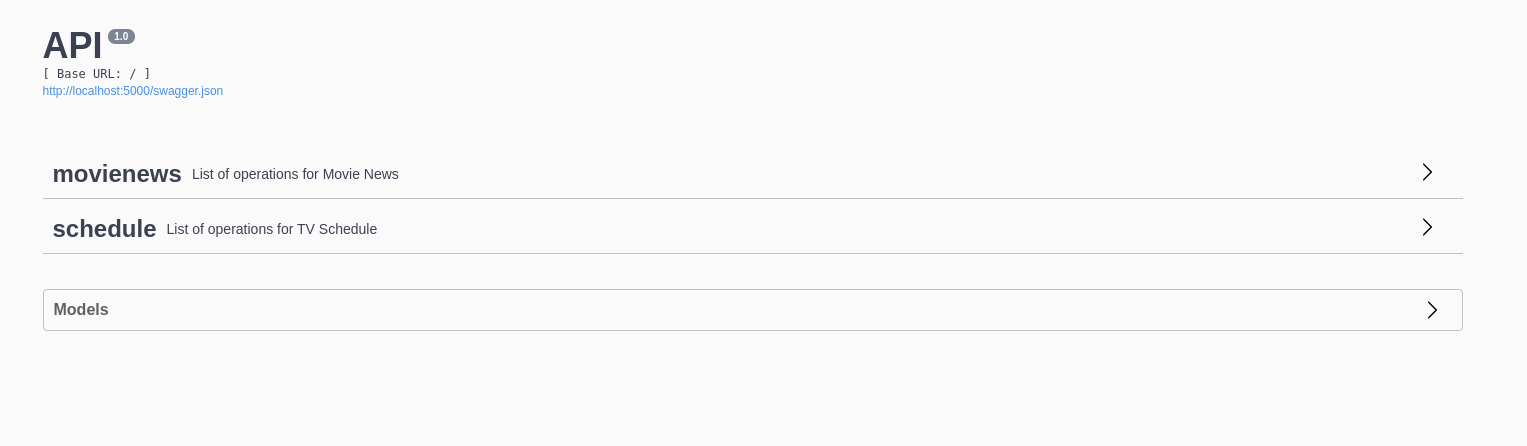
I have defined 2 namespaces called ’ns_tvsched’ and ’ns_movienews’. I shall focus on only 1 namespace for this example; ’ns_tvsched'.
The root namespace is called ‘schedule’ which means any calls to endpoints will route to ‘/schedule/<…>’
Namespace: ’ns_tvsched’
from flask_restplus import Api, Resource

ns_tvsched = Namespace('schedule',description='List of operations for TV Schedule')

# get latest tv schedule
@ns_tvsched.route('/latest')
@ns_tvsched.doc(responses={200: "OK", 400: 'Invalid Argument', 304: 'Not modified'})

class LatestSchedule(Resource):

    def get(self):
        """
        return json schedule
        """
Endpoints
/schedule/latest
- Returns JSON response of latest TV schedule
- Method: GET
/schedule/show/add
- Adds a new TV Show into database
- Method: POST
- Payload: JSON
/schedule/show/update
- Updates existing TV Show in database
- Method: PATCH
- Payload: JSON
/schedule/show/delete
- Deletes TV Show from database
- Method: DELETE
- Params: ID
Request Parameters
Injecting request parameters are defined as the following.
<int:showId> - means that the required request parameter called showId must be an integer
def delete(self,showId): - defines a delete function which uses the
@ns_tvsched.doc - documents the HTTP responses
@ns_tvsched.route('/schedule/show/delete/<int:showId>')

@ns_tvsched.route('/show/delete/<int:showId>')
class RemoveShow(Resource):
    @ns_tvsched.doc(responses={202: "Deleted", 400: "Invalid Argument", 304: "Not modified"})
    def delete(self,showId):
        """"
            do delete
        """"
When the app is run, swagger renders the following.
Here is another example.
""" Model for inserting a new show into a database """
insert_show_data = ns_tvsched.model('Add new show',{
    "tv_maze_id" : fields.String(description="TV Maze ID", required=True),
    "name" : fields.String(description="Show Name", required=True),
    "tracking" : fields.Boolean(description="Tracking", required=True),
    "description" : fields.String(description="Summary", required=True),
    "network" : fields.String(description="Network", required=True),
    "officialsite" : fields.String(description="Official Site", required=True)
})

"""
Endpoint to add a new TV Show
"""
@ns_tvsched.route('/show/add')
class AddShow(Resource):
    @ns_tvsched.expect(insert_show_data)
    @ns_tvsched.doc(responses={201: "Created", 400: 'Invalid Argument', 304: 'Not modified'})
    def post(self):
        json_data = request.json

        """
        Process JSON, add new tv show to database
        """
Breaking down the above code.
insert_show_data= defines a structured request parameter; when a request is made to add a new TV Show it must conform to the valid fields as described in the code.@ns_tvsched.expect= only the mandatory model defined is allowed to be used in the request
Swagger renders the following.

Clicking on Try it out! will load a view to inject the required payload parameter. Clicking on execute will post the payload.
Swagger UI
Inside the app.py which is the entrypoint required to launch flask.
api = Api(app=flask_app,doc='/docs')
This overrides the location of where the Swagger docs can be reached. By default it is located at the root via - http://localhost:5000
By providing doc='/docs' Swagger UI will be accessible via - http://localhost:5000/docs
Testing the API
You can use tools like Curl, Postman, SoapUI or even Swagger itself to test that the endpoints exposed are working as expected.
curl http://localhost:5000/schedule/latest
# returns JSON array response
Working with multiple namespaces
I touched briefly on using multiple namespaces, and how it ensures a more cleaner and organised API structure.
In your main Flask app.
app.py
from ns_movie_news import movie_news as ns_movie_news
from ns_tv_sched import schedule as ns_tv_sched

api = Api(app=flask_app,doc='/docs')

api.add_namespace(ns_movie_news)
api.add_namespace(ns_tv_sched)
...
This means I have 2 APIs setup.
- /schedule
- /movienews
Hints
Hiding endpoints from the Swagger UI use the following decoration. Which instructs flask-restplus to hide the endpoint from the docs.
@api.doc(False)